Chapter 1. Introduction
PEF stands for Plain English Firewall. The current version is a complete bash based firewall written around iptables.
The reason to write this firewall abstraction is why so many of those programs are written, to make the complexity of firewalling manageable for the less GNU/Linux initiated. This doesn't mean you do not need indept knowledge of TCP/IP, you do!
What I wanted was:
Easy readable rules file
A front-end to manage everything related to the firewall
A backend that could do every type of firewall
Initial only bash, since that is what I can expect on our firewalls to be present
Backend should create firewall script, so that it can be copied to the firewall. There should be no need to install the manager on the firewall.
Plain English Rules
I wanted a rules file that was readable just as if it was English. So something like: allow smtp from my_server to your_server
The manager idea
The biggest problem with firewall wrappers is that they concentrate on the configuration files, while the easiest way to hide complexity is to write a configurator. This is what pef-manager.sh is about.
With the separation between the manager and the rules creator, it is now very easy to write other managers, like a web-interface or a GNOME/KDE/GNUstep version.
Back-end support
We have firewalls running GNU/Linux 2.2.x with ipchains and 2.4.x with iptables. Both should be supported. When I already need to support 2 different tools why not make the abstraction such that every tool can be supported?
Create a script
Since others might eventually like to create other interfaces to PEF, and most System Administrators do not like X running on their firewall, or even a web-server, I decided to make the rule parser pef-parser.sh create a script that does setup the firewall. This way one could have one machine that acts as the firewall configurator and another that executes the script and is the actual firewall.
Chapter 2. Using pef-manager.sh
Before explaining all the ins and outs of the PEF firewall, I would like to make you familiar with the PEF manager. I hope that with this explanation the entire system will become clear.
Starting the PEF manager
Dependend on where you installed PEF go into that directory and type: ./pef-manager.sh
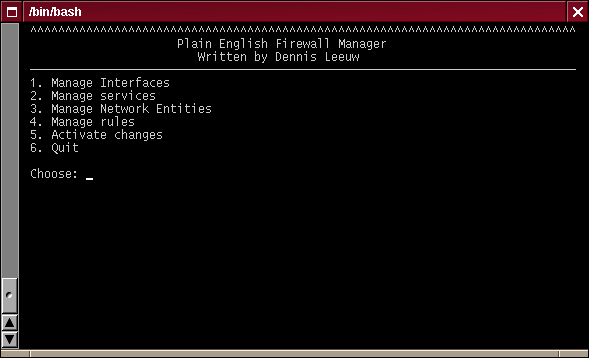
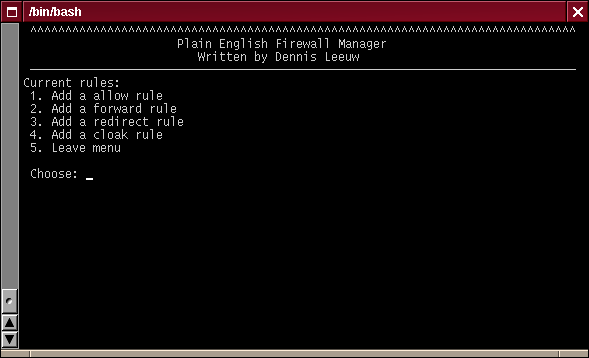
Main Menu
The Quit option makes you leave the manager. All other options will be described below.
Manage Interfaces
This option helps you to set the values that are important to your local interfaces.

Interfaces Menu
The option Leave menu, brings you back to the main menu
When you first start pef-manager.sh there is probably nothing below the Or change: line. This means nothing is defined yet and you should start with the Add an interface option.
Add an interface
The first question you will get is:
Interface name: |
Interface name: eth0 Is this a fixed IP address [Y/N] |
Interface name: eth0 Is this a fixed IP address [Y/N]Y Interface IP address: |
The MAC address belonging to the interface:
Interface name: eth0 Interface IP address: 192.168.1.1 Interface MAC address (can be empty): |
Interface name: eth0 Interface IP address: 192.168.1.1 Interface MAC address (can be empty): Expect only public IP addresses on this interface? [Y/N] |
You are done with the input of all the information. The manager will now ask you to confirm that the data that is entered is correct. You can select one of the numbers to change some or all of the values, or you could type ok to confirm that all is correct.
As soon as you have confirmed your entry, you will be returned to the interfaces menu. Notice that below the Or change: line you will now find the by you added interface.
 | In my interfaces list you see an interface called eth0_0. This is the PEF way of describing an alias interface. So if your want to add an alias interface use the interface name and add _alias-number. |
Delete an interface
You will be presented with a list of the interfaces that can be deleted. Select one and type enter.
The interface gets deleted and you will return to the interfaces menu. Notice that the interface is gone from the Or change: list.
Change an interface
Select the number in front of the interface. You will now be presented with the same menu as the confirm menu from the Add an interface section.
Manage Services
This section describes how to manage the services that are known within the firewall. It expects that you know how a session works and that you can define a service correctly.
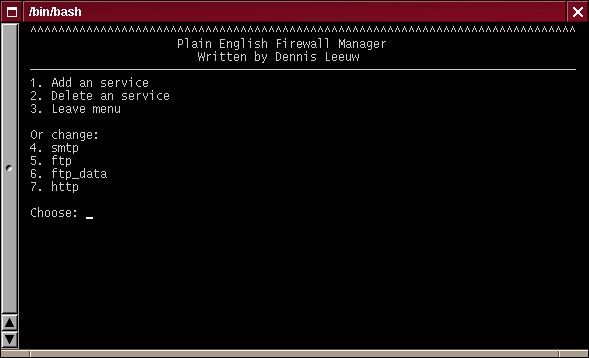
Services Menu
This menu entry is only useful for adding services. I will do my best to supply as much services per default.
As an example we will add an icmp service. So we first select Add a service.
The name of the service: |
The name of the service: ping The port the service is running on: |
The name of the service: ping The port the service is running on: 8 The port(s) the connection comes from: |
The name of the service: ping The port the service is running on: 8 The port(s) the connection comes from: 0 The protocol the service uses: |
Within the menu that follows, there is one special option that you probably won't need, but that I would like to mention anyway. There is the Reply protocol: field, which is normally the same as the protocol you just entered, but might be different. A good example of this is a traceroute, which opens with UDP and replies with ICMP.
Change the settings to your liking if they are not right and type ok to add the service to the database. You will be returned to the Add a service menu, where you can see that the service is added to the list below Or Change:
Manage Network Entities
This manages everything that is living on your or someoneelses network. Like servers and routers, etc.
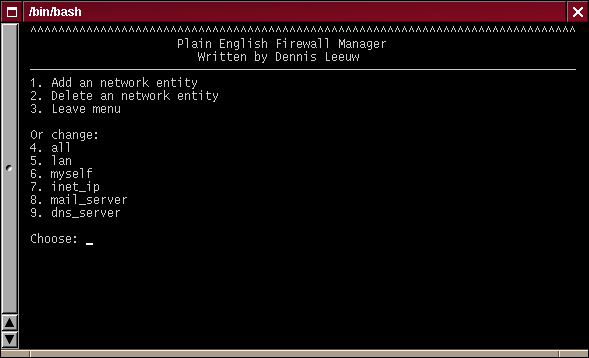
Entities Menu
Leave menu brings you back to the main menu. If this is the first time you use pef-manager.sh there might be nothing below the Or change: line. Within my menu you see a couple of examples of what entities might be.
Add an network entity
The first thing that will be asked is:
Name: |
| Entity names can only contain characters, numbers and underscores. No spaces are allowed |
Name: dns_server IP-address: |
Name: dns_server IP-address: 192.168.1.5 Netmask (32 or 255.255.255.255 for a host): |
Name: dns_server IP-address: 192.168.1.5 Netmask (32 or 255.255.255.255 for a host): 32 Interface: |
And that is it. You will now be asked to confirm your entries, or to choose to change one or more of them. When you are happy type ok and you are done and will be send back to the Add an network entity menu.
Note that the added entity will be visible below the Or Change: line.
Delete an network entity
You will be presented with a list of the entities that can be deleted. Select one and type enter.
The entity gets deleted and you will return to the entities menu. Notice that the entity is gone from the Or change: list.
Change an network entity
Select the number in front of the entity. You will now be presented with the same menu as the confirm menu from the Add an network entity section.
The rules
I have tried to make the rules section as easy as possible and have defined the following rule types:
Allow rules. These rules define connections to and from the firewall itself. If you define a rule like: allow smtp from eth0 to mail_server. It means that connectiion attempts from the firewall to the mail_server are allowed. The same goes for a line like: allow ssh from my_host to eth1. Which means that my_host is allowed to connect to the ssh server on the firewall.
Forward rules. Actually these are normal routing rules. It allows a packet from a machine on one network to connect to a service on another network.
Redirect rules. A redirect rule redirects in incoming connect on one of its interfaces to another host. This way you can shield e.g. your web_server(s) from the internet. Everybody on the outside will think they connect to your webserver, but actually they connect to your firewall, which redirects the connection to your server. This option might be handy when you have less IP addresses then servers you want to connect to the Internet.
Cloak rules. The cloak rules give you the ability to hide source addresses behind another address. Assume you have assigned a private class C address range to your internal network (e.g. 192.168.1.0) and you want to make it possible for your users to surf the Internet. Then you need to cloak the rules from your internal network to appear to be coming from your firewalls Internet interface.
Hide rule. The hide rule changes both the source and destination IP address. I personally needed this rule to by-pass some routing rules. This function should not be used in normal situations. It is here for convinience.
Managing the rules
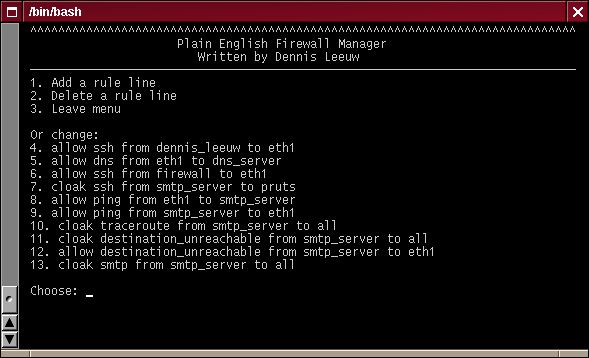
Rules Menu
The actions of this menu are somewhat different from the menus in the other sections. The initial menu should look familiar by now. We will jump directly into the Add a rule line part. As soon as you have selected this option you will be faced with a menu like this:
Add Rules Menu
Select the type of rule you would like to add and note the changes on the top line of the menu. For the example I have choosen to use Add a allow rule.
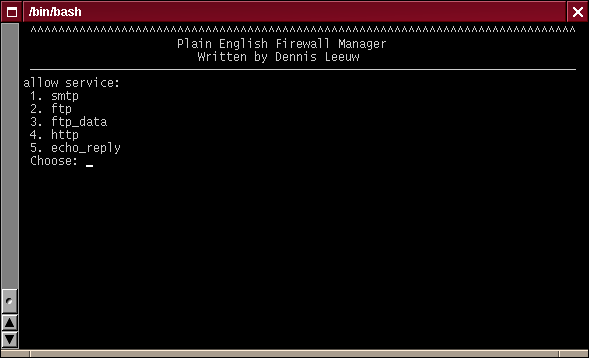
Add Service Rules Menu
You are now directly presented with the available services. Let's select the ping service we added. And again note the changes in the menu title.
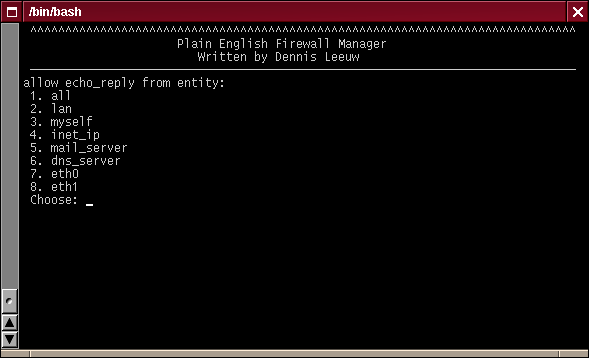
Add Entity Rules Menu
Here you can choose from the defined services, but also from the list of available interfaces. This is only possible with the allow rule. All other rules will show you interfaces or entities. Since I want to add the ability to be able to ping the firewall from the LAN, I will add an ping from the firewall to the lan.
The following screenshot will show the rest of the process. And for the last time, watch the line above the menu telling you what you already entered.
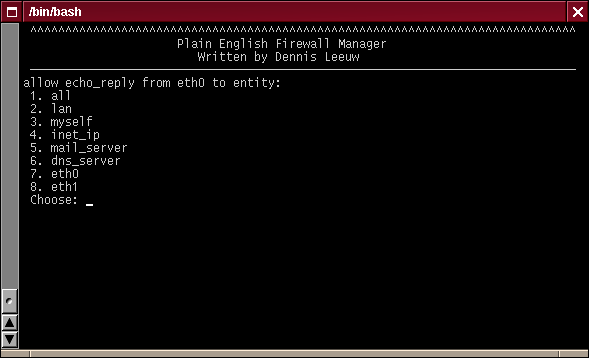
Add Second Entity Rules Menu
As soon as you have typed the number of the last entity the rule is added and you will be returned to the main Add a rule menu.
Chapter 3. The PEF structure
Part one are the configuration files and second we have the actual rule file that needs to be created from this. To abstract both the pef-parser.sh script uses two arrays per rule. One is the PEF_IN array, which holds variables build from the rule and second it writes out PEF_OUT which is an array holding the actual rules.
With this setup I have one single entity that is fed to the function that is responsible for creating the tool (firewall command) specific rules. This also means that when you want to add functions for the tool, you only need to study the PEF_IN variables that you get from the pef-parser.sh
In an ASCII art graphic this would look like this:
config -> parser -> PEF_IN -> tool specific function -> PEF_OUT -> parser -> nspef.sh
The config files
PEF knows four types of config files:
services
interfaces
entities
rules
services
A services entry looks like this:
smtp=(
        CONNECT_PORT=25
	ORIGIN_PORT=1024-65535
	CONNECT_PROTO=tcp
	ORIGIN_PROTO=tcp
) |
interfaces
A interface entry looks like this:
eth0=(
   	FIXED_IP_ADDRESS=yes
        IP_ADDRESS=192.168.1.1
	MAC=
	INTERFACE=eth0
) |
entities
A entity entry looks like this:
mail_server=(
        IP_ADDRESS=192.168.1.2
	NETMASK=32
	INTERFACE=eth0
) |
PEF_IN
From the above config files the pef-parser.sh creates a PEF_IN array with the following elements:
PEF_IN=( FUNCTION= LOG= DIRECTION= SRC_PROTO= SRC_PORT= DST_PROTO= DST_PORT= SRC_IP= SRC_MASK= SRC_IF= IN_IP= IN_IF= IN_MAC= DST_IP= DST_MASK= DST_IF= OUT_IP= OUT_IF= OUT_MAC= ) |
FUNCTION. The FUNCTION variable holds the function as mentioned in the rules file: allow, forward, redirect, or cloak
LOG. This variable can have two values: dolog or nolog, which both speak for themselfs.
DIRECTION. Can have two values incoming or outgoing. This is only meaningful for the allow rule.
SRC_PROTO. Is the protocol that is used in the rule setup direction of the connection, like tcp, udp, icmp etc.
DST_PROTO. Is the protocol that is used in the rule reply direction of the connection, like tcp, udp, icmp etc.
SRC_PORT. Is the service port where a connection is coming from. When there is e.g. a connection to the smtp server on a firewall the SRC_PORT is set to 1024-65535, since the connecting party has one of these ports.
DST_PORT. Is the port to which the connection is going. In the above example it is set to 25.
SRC_IP/SRC_MASK. The IP-address/netmask where the connection is initiated from.
DST_IP/DST_MASK. The IP-address/netmask where the connection is going to.
SRC_IF. The interface on which the connection enters the firewall.
DST_IF. The interface on which the connection leaves the firewall.
IN_*. The settings for the incoming interface.
OUT_*. The settings for the outgoing interface.
To dereference this array in a bash script use:
local SET_ARRAY="PEF_IN[*]"
local ${!SET_ARRAY} |